
One of the more complicated part of building a van for many people is choosing the right equipment for the electrical system. Selecting electrical components for your build can have long lasting impacts on how you use your DIY camper van. Will you have enough power to charge all of your devices? How will batteries get recharged when they are low? Where and what kinds of outlets do you install? And most importantly, how do you build such a system by yourself and ensure that it is safe?
Of course these were all questions we had for ourselves during our van build. Luckily for us, we have many years of full-time living in campers under our belts so we knew just exactly how we would use our electrical system. By no means did we build a ‘spare-no-expenses’ ultimate system of our dreams. We had limitations to work with but we tried to build the best system we could knowing our limitations.
We were not limited by our skills or our knowledge of building an electrical system. Our time on the road has given us all of the knowledge we needed to tackle such a project. What we needed was to build a system that was easy to maintain while traveling across unknown parts of the world as we begin our journey across the Atlantic. Keeping costs within our budget and accomplishing the project within a time limit were the primary challenges.
We bought our van in April of 2018. We planned to drive across from California to Maryland to place it on a freight ship destined for Europe by September that same year. In those 5 months we had several other big projects that needed our attention.
Since we were leaving the country, we had to settle all of our state-side affairs for the foreseeable future while we are abroad. Based on all of those factors, we gave ourselves between 30-45 days to complete the entire van build. Only a fraction of that time was dedicated to the electrical system.
Before I go any further, I must warn you. This is not something you should attempt to do on your own if you do not have thorough knowledge of how everything works. I don’t want anyone getting hurt. Always consult a professional before performing any type of electrical work. Use any information from this post at your own risk. OK, I just need to make that disclaimer perfectly clear. Now we can go on.
Goals for Building Our Electrical System
Keeping it simple
Because we live on the road full time, we don’t have a shop to make major repairs. When we are in the US, we have friends and family that can occasionally help us by providing space, tools and an address to received replacement parts. But since we plan to live nomadically aboard with little to no friends or family near, simplicity outweighed fancy equipment.
Keep it flexible
Flexibility is key to making a maintainable and sustainable system. We wanted to be able to charge mostly from the sun so we didn’t solely rely on finding AC outlets for power. We didn’t want to just have hard-mounted solar panels so in hot weather, we could park in the shade yet still place a portable panel out to recharge. Also we wanted to be able to plug in to Europe’s 240 volt AC outlets from time to time without overloading our system when it is available.
Keeping it inexpensive (but use high-quality components)
We do not have an endless well of cash. That means we needed to pick and choose how much we pay for each component yet still keeping them high quality. I have used many makes and models of all types of RV electrical components in the past. It is true that you get what you pay for. Marine-grade equipment is definitely built to a higher standard that RV-grade gear but the prices also reflect it.
With a lot of research and using my personal experience, I knew exactly when it is worth the cost to splurge on higher cost items. Sacrifices did have to be made in some areas but as long as the quality is sufficient, we were able to keep relatively close to our budget. Speaking of that, we didn’t have a specific budget for the electrical system. It all fit into the budget for the entire build.
Use components that can be sourced or replaced easily
There are many specialty companies making great new and innovative products. With RV traveling surging in popularity, the marketplace is full of cool and fancy gadgets. But the components of our system need to be easily found online and shipped internationally when a replacement is required without a lot of hassle.
As much as the United States is enamored with ‘van life’, the rest of the world isn’t quite as enthusiastic. Our selections of components in that case cannot be too specialized. It goes with the idea of keeping things simple and flexible.
Our Component Selection
Batteries
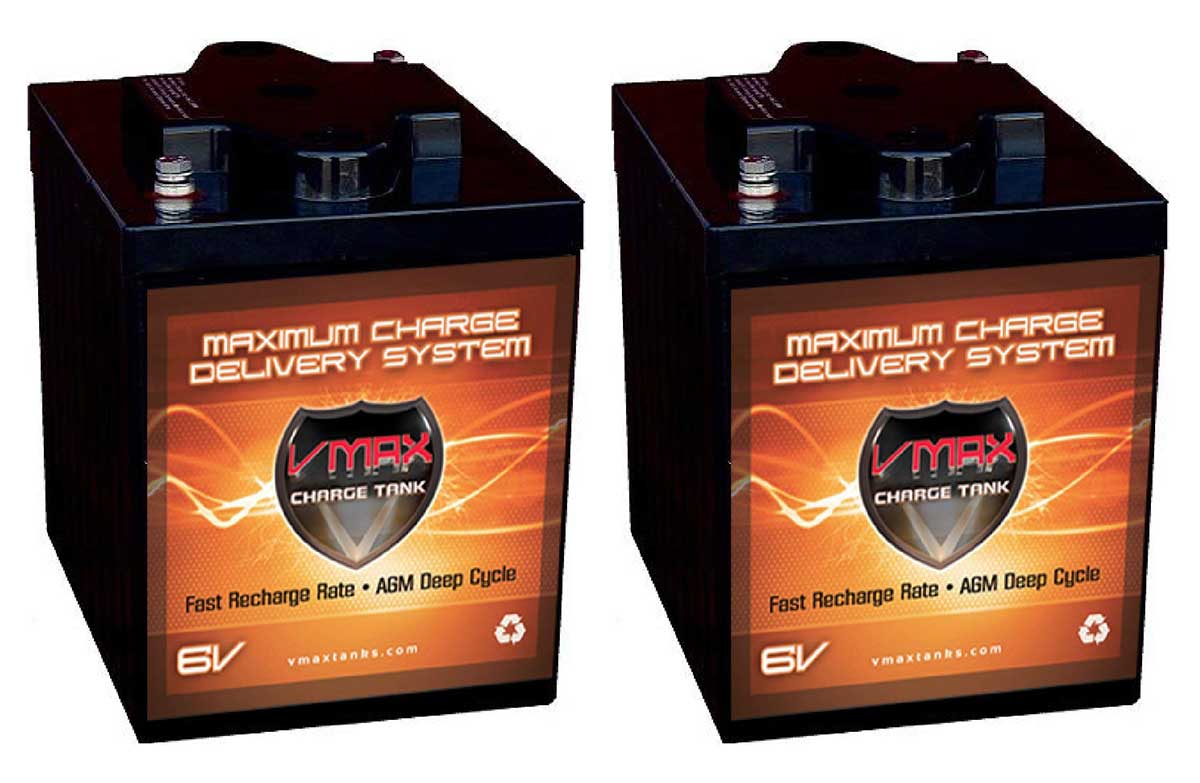
For our batteries, we selected two 6-volt AGM deep cycle batteries. We chose it for a few reasons. First and probably the biggest reason is the price. Although lithium systems are getting more popular and readily available, they are still much more expensive than standard lead acid batteries. For example, for 225 amp hours of AGM, my cost was $560. To compare apples to apples in usable amp hours, I will compared it to a 100-amp hour LiFePO4 battery that is priced at $1000. It is still nearly double the price of comparable AGM. We will most likely upgrade to newer battery technology at the end of these batteries’ usable life. What it will be we do not yet know. Battery technology is moving very quickly at the moment and since we expect these batteries to last roughly 4-5 years, we will see what is the best option when the time comes.
Update from October 8th 2020: It’s been almost 2 years since I wrote this post and have anything changed? Read a out our thoughts on whether or not if it is finally the right time to upgrade to lithium in your RV
Some of you might ask why we bought two 6-volt batteries to run in series instead of just buying 12-volt versions. It is because for the same amount of battery capacity, 6-volt batteries take up slightly less footprint.
We also chose AGM sealed batteries instead of flooded lead-acid batteries because these do not require any ventilation. They do not off gas like the traditional flooded batteries do. They are maintenance free and are safe to install indoors.
Solar Panels

- Two Newpowa 175-watt rigid solar panels
- Link Solar Weather Proof Double Entry Gland
- 100-watt Portable Solar Panel Suit Case
For our solar panels we had to chose them based on the placement of them on the roof of our van. We decided early on that we wanted two Fantastic Fans on the roof, one above the passenger row seating area and a second in the rear about a foot from the end of the van, we needed to maximize the amount of power we can generate while not taking up too much space.
First of all, I no longer trust semi-flexible solar panels. I’ve owned two of them and both failed prematurely. Everyone I’ve ever known that has owned them all have stories of them failing. They simply do not offer the same level of reliability as rigid panels so they are totally out of the question at this current time. Maybe they will get better in the future but for now, I’m a rigid panel guy.
The best option we came across were two 175-watt rigid solar panels from Newpowa. By connecting them together using aluminum L-brackets, we are able to mount them directly to the roof tracks without extending beyond the edge of the van. By running the panels in series, we have a system outputting 350 watts at peak power with an open voltage of 38 volts at just 9 amps. Because they are connected in series, there are a handful of advantages. It simplified the wiring as I didn’t need to run terminal busses for the 2 panels and I was able to use relatively small wires (10-gauge) without much drop in voltage.
The downside of wiring in series is that any partial shade on the panels can drastically drop its output. I will need to make sure I keep the panels clean and out of shade when I need charging power. With the panels wired in series, a hole was drilled on the roof and a Link Solar weather proof entry gland was used to keep water out of the interior.
From our previous campers, we also made room for a portable suitcase solar system from Renogy. There are ready-made suit case solar systems for purchase but our system is self built using two 50-watt panels we already owned and hinged together. A standalone solar charge controller is used to keep the system more flexible. If we are camping with a friend who isn’t able to generate their own energy we can easily lend this system to them.
My method of sizing a solar panel array is based on how much power can be store in the batteries. I follow a 3-to-1 watts-to-amps rule of thumb. Some others might go with a higher ratio like 4-to-1 or 5-to-1 depending on how much sun exposure they get in the area they mostly travel, others might go with a lower ratio like 2-to-1 if they live further south towards to equator and have mostly sunny days.
I have 350-watts of solar to my 225 (112.5 usable) amp hours of battery. Going by the usable amp hours of my AGM battery bank, It is very close to a 3-to-1 ratio. If I include the 100-watt suit case system into the equation, I’m closer to having a 4-to-1 watts-to-amps ratio. I’m perfectly happy with that.
Solar Charge Controller

Running the solar panels in series means that I needed to use a MPPT (Maximum Power Point Tracking) controller. A MPPT controller can take a much higher voltage input and dynamically convert it to the appropriate charging voltage by increasing the amperage output. For example, if I was bringing in 39-volts of power at 1 amp, a MPPT controller can convert the voltage to 13 volts which is more appropriate to charge a 12-volt battery. But because it reduced the voltage by 1/3, it is able to triple the amp output to give me 3 amps of charge to the batteries.
There are many MPPT charge controllers out there, the best for my application is the Victron SmartSolar MPPT 100/30 Solar Charge Controller 100V 30A with Bluetooth. It is compact, it can take input voltage up to 100-volts and it can produce a maximum of 30 amps of charge to the batteries. The best part is that there is a built-in bluetooth module that allows me to track and monitor the condition of my electrical system using either an Android of iOS app. This eliminates the need for a separate battery monitor.
I also did not install a shunt to monitor current flow. I’ve used solar systems long enough to know exactly how they should behave and how much power is left in the system. This also simplifies the components while saving costs.
Shore Power Charging
We planned for enough solar panels to not really need to ever plug our van into the grid for power. However there will be times when we will find ourselves in overcast weather for extended periods of time without a way to replenish our power. While we are traveling in Europe, we also need our shore power charging system to be compatible with Europe’s 240-volt AC power grid.
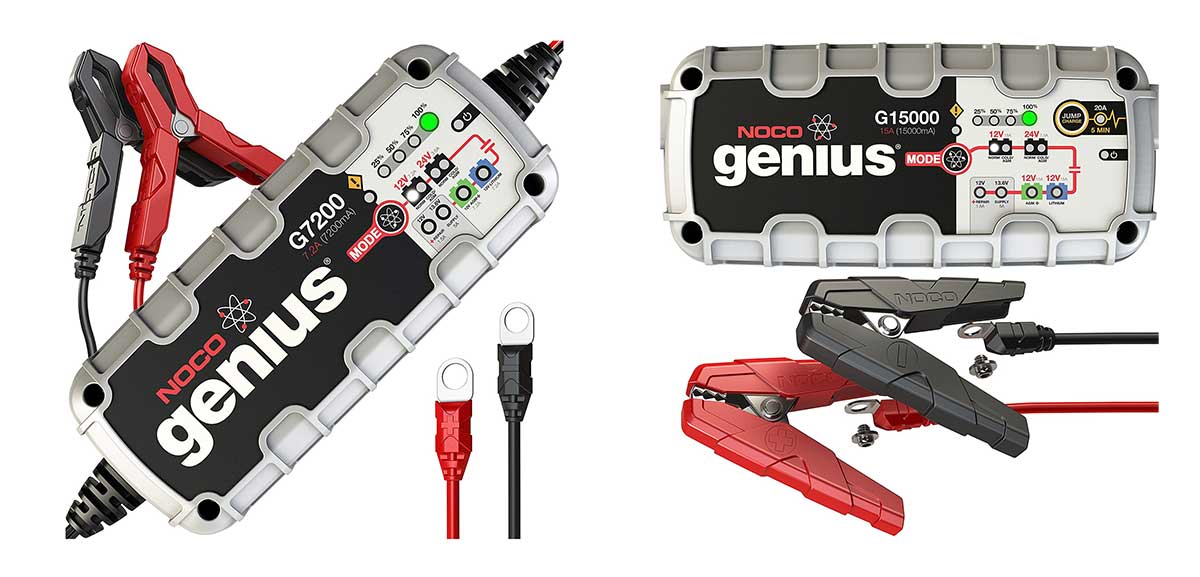
Rather than installing a dedicated converter charger, we opted for the NOCO Genius Portable Smart Battery Chargers. We have both a US model as well as a UK model. The US model is the NOCO Genius G7200 which charges at 7.2 amps per hour. For our 240-volt counterpart, we chose the next size up which is the NOCO Genius G15000UK Smart Charger. That will charge our batteries at 15 amps per hour. These are smart multi-stage batteries chargers that are compatible with many types of batteries including typical flooded lead acid, AGM as well as lithium which will helps to future-proof these purchases in case we decide to switch to lithium later.
Some people have raised concerns about these battery chargers not being able to replenish a large battery bank quickly enough. That might be true for large, expensive lithium systems but it is more than plenty for our simple and flexible system. To put it into perspective, 7.2 amps per hour is roughly how much a 100-watt solar panel can produce at peak capacity. Having this plugged into an outlet and charging is equivalent to having that panel producing at full capacity 24 hours a day. And of course the 15-amp model will more than double that output.
Pure Sine Wave Power Inverter

The power generation and storage in any camper is based on DC (direct current). Just like the battery in your car, 12-volt DC can be used directly through a lighter socket or other similar DC outlets. It not only keeps things simple, it is also much more efficient than to invert the DC power to household 110-volt AC power. But there will be times when AC power is necessary.
For example, if we wanted to run a blender or spice grinder in the galley, we will need to plug it into a wall outlet. Although our computers can charge using DC plugs, using AC power adapters that came with them can charge up much faster as it is designed to carry more power using smaller wires without overheating.
That’s why we chose to have a pure sine wave power inverter on board. It is only used when we need it and a small remote switch under our bed can turn it on as needed it. It can be left on always but know that there is a small amount of electrical draw for it to stay on even when nothing is plugged in.
We chose the Sunforce 1000 watt Pure Sine Wave Inverter for a few reasons. The main reason is actually the fact that we already owned it. We bought it when we were customizing our Casita 16 trailer but when we received it, it ended up being much larger in dimension than we expected. It is a true pure sine wave inverter which means sensitive electronics can be plugged into it without concern.
At 1,000 watts, it can handle every kitchen appliance we have without overloading it. If you plan to use higher draw versions of such appliances such as a Vitamix Blender, Instant Pot or toaster ovens, you will need to find at least a 1,500 watt version. At that point, you will also be pushing the limits of a 12-volt battery system and most likely want to consider a 24-volt system which will come with added complexity. That is a topic for another post.
Our Sunforce inverter isn’t by any means a high-end product but it does the job for occasional use which is what we were looking for.
Switch Panels, Fuse Panels and Breakers

- Blue Sea systems 100-amp thermal breaker
- Blue Sea 12-circuit fuse block
- Cllena Switch Panel with Voltage Meter and DC Outlets
These components are critical in making the right connection to keep your van a safe and comfortable place to live. In our system, we do not have an extensive AC system. It goes with the concept of keeping it simple. The extent of our AC system is a Blue Sea systems 100-amp thermal breaker that leads to the power inverter.
If for some reason the inverter fails and tried to draw too much power from the batteries, it will trip and prevent overheating. Also the power inverter has a built-in circuit breaker for some redundancy. From the AC outlet of the inverter, we are also using a surge protector so overloading is prevented from both ends.
On the DC side, everything that draws power from the battery is fused through a Blue Sea 12-circuit fuse block. Depending on what the appliance is on the other end, different size automotive style fuses are used to prevent electrical shorts from creating a fire. Some of the appliances receive constant power while others are wired through a switch panel.
Some people prefer to have switches mounted individually near the appliance for convenience. We decided it was simpler to keep all of the switches at one place. It keeps the wiring process SIMPLE, there’s that word again, and since it is such a small place to begin with, it isn’t a big deal to turn on the lights and the water pump from the same place. We chose a relatively inexpensive switch panel made by Cllena. It is actually designed to be a fuse block and switch panel all in one. It has 5 toggle switches, a voltage display, a 12-volt socket and two USB outlets.
We did quite a bit of modification to this panel for our purpose. First thing we did is to rewire the back of this switch panel to bypass all of the inline fuses that came with the unit. We already have our DC fuse block so it was not necessary to have yet another fuse for every wire. We also opted to use one of the toggle switches to turn the voltage meter on and off. It is brightly lit with green LEDs which are nice when you need to see them. But without the ability to turn it off, it is much too bright. Especially since we chose to mount it near our sleeping area.
I will say that knowing what I know now, I would probably look at other panels. It was tedious to rewire it all and it is just OK in quality. I don’t think it will fail us but if it does, I will need to buy the same panel to replace it or at least one would fit in the same size hole that was cut into our cabinet for a clean look.
Wires, Buses and Outlets

- Blue Sea systems 10-gang bus bars
- 4-gauge stranded copper wires
- 12-gauge and 14-gauge stranded wires
- Sea Dog stainless power sockets
You will need more wires than you think. Because you need to do most of your wiring before you start building out the interior, it is difficult to think of everything that far ahead in the build process. Inevitably, you will want to have a power outlet somewhere that you didn’t think you would need during the planning stage.
For you basic 12-volt wire runs, 12-gauge wire is sufficient for lights, fans, lighter socket outlets, piezo ignitor on your stove and other low-amp draw devices around the build. You will need to have pretty heavy gauge wires to connect your solar controller to your battery. We have 10-gauge wire that runs from the solar panels down to the input of the solar charge controller. Because we are running two panels in series, we have a max of only 9-amps that come from the solar panels. But leaving the charge controller once the MPPT algorithm has done its thing, we can have as much as 28 amps of power at peak charge times.
We are using two Blue Sea systems 10-gang bus bars to connect all of the wires together. One is for positive and one is for negative. From there, 4-gauge stranded copper wires are used to connect to the AGM batteries as well as the power inverter. 4-gauge wires also connect from the bus bars to the fuse panel and from there, 12-gauge or 14-gauge wires snake their way around the van to make the appropriate connections to power each appliance.
Wherever a 12-volt socket is needed, I use a Sea Dog stainless power socket for their high quality construction and durability. I’ve tried too many cheap plastic outlets to know that this is a high stress point with constant plugging and unplugging and you don’t want it to break on you.
Lighting

Our lighting was kept very simple. Since we decided to reuse the headliner of the van, we also decided to use the existing light fixtures that came with the van for a factory look. We did have to make a couple of changes. When we had the headliner out, we rewired the light fixtures to run off of the house battery instead of the starting battery. This way we don’t drain the starting battery when the engine is not running.
We were also able to install a separate switch to turn those lights on and off using one of the toggle switches on the switch panel. The original bulbs that came in the van were not LEDs. They gave out a lot of heat and were very inefficient. We found drop-in replacement LED bulbs from Amazon and they work pretty well. I do wish they were a little brighter and a bit warmer in color temperature. I might try some other bulbs in the future but these will do for now.
Tools and miscellaneous gear

- Nice set of wire stripper/crimper
- Shrink tubing of various sizes
- Soldering iron kit
- Multi-meter and continuity tester
- Bulk pack of adhesive-backed wire clips
Unlike building the rest of our van, which consisted of using a lot of carpentry tools, building the electrical system required other skills and tools. Specifically you will need to get familiar with working with stranded copper wires. Cutting, measuring, splicing, soldering and running them will be tedious and time consuming. Having the right tools will be critical. Getting a nice set of wire stripper/crimper will save you a lot of headache, time and broken fingernails.
Connecting wires together and to end terminals will require other tools. shrink tubing of various sizes and a good soldering iron kit will become your best friend. The last thing you want to do is twist a bunch of wires together by hand, wrap electrical tape around it to keep it together. They are going to fail at some point and cause a short. You will have a tough time figuring out where it failed, especially if they are hidden behind walls. Do it right there first time and never worry again.
A multi-meter and continuity tester will also save you a lot of headache when things don’t work right. It doesn’t need to be expensive but you have to be able to trust that it is giving you the right readings. Learn how to use all these tools properly. Depending on how you plan to run your wires, a bulk pack of adhesive-backed wire clips can come in handy when you need to keep the runs of wires organized. If you plan it right, you can keep all your wires out of sight yet still be easy to maintain and troubleshoot if something goes wrong.
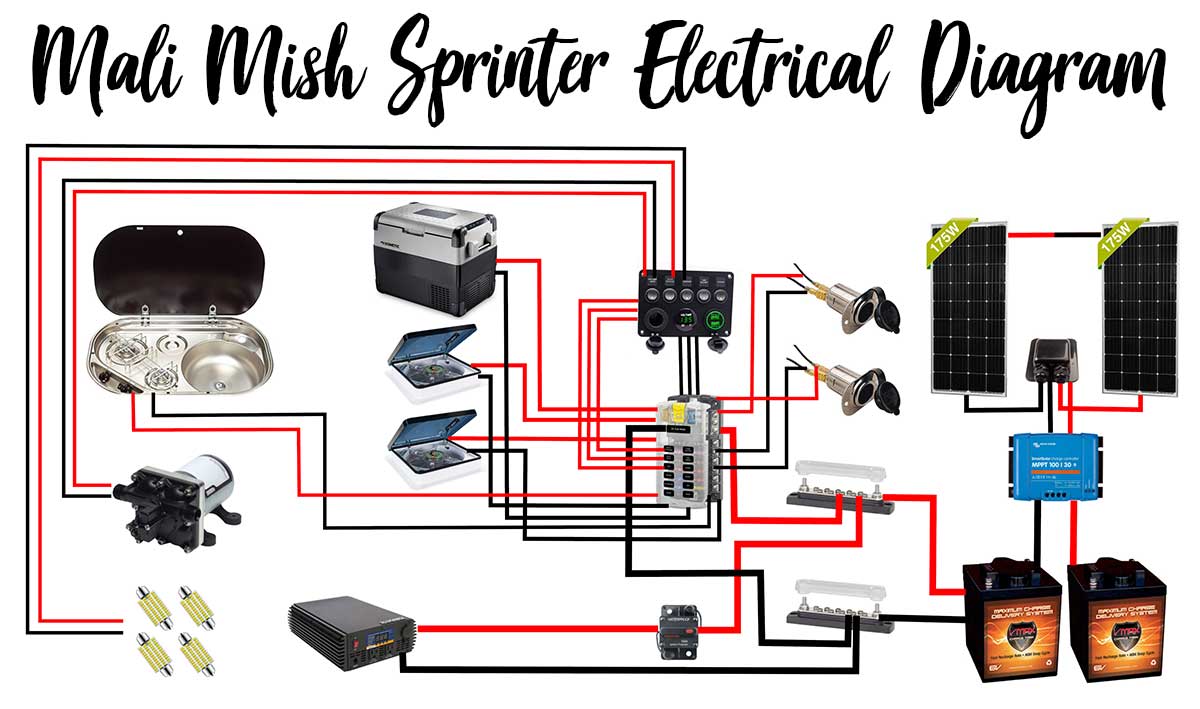
Electrical Schematic/Diagram
This is the basic layout of how we have wired our system. Some of the items like the NOCO Genius charger is left out for simplification purposes. There is also an in-line blade fuse between the solar panels and the charge controller that isn’t shown. Other than that it is pretty much how the system works.
No power goes from the battery to anything that draws from it without either a fuse or a circuit breaker. The water pump and lights are wired through toggle switches. Our power sockets, piezo ignitor on the stove, fans and fridge are constantly powered without a switch.
Other Considerations
Once again, our electrical build was done with several considerations in mind. It is not by any means the perfect system for everyone but it does work well for us given the type of traveling we plan to do. We wanted to use mostly DC appliances and also committed to using propane for cooking and heating. It greatly simplified the build and gave us room to upgrade in the future if we chose to. We were able to easily source all of the equipment we needed in a short amount of time to complete our build and kept it to a reasonable budget.
The current trend that many van builder are doing is heavily utilizing AC power. That has recently become popular because of lithium batteries allow much higher storage capacities, higher current draws in less space and lighter weight. But it adds more complexity and cost to the system. Not only are lithium batteries more expensive, if the choice is to use electricity for everything to eliminate the need for propane, much more power will be needed and even more solar panels on the roof will be necessary to be completely off grid without running a power deficit.
Yes this type of build can make the van feel much more like a typical American home with AC outlets everywhere and the ability to use normal household appliances. But it comes at a cost that is orders of magnitude higher and most likely it will not allow the van to have any roof space for additional gear. Since we are a family of 5, we don’t have a ‘garage’ in our van build to store toys inside. Where a garage would be in a van built for a couple, we need that space to have our second bed. This means the roof is needed to storage things like surfboards and other outdoor equipment. Packing it full or solar was not an option.
Summary
Many newcomers to this lifestyle want the luxuries they are accustomed to in the home they use to have. Having a large and expensive AC-heavy electrical system can definitely help with the transition. For us, we can live a comfortable life on the road without all those kinds of luxuries. We are use to this way of living and keeping things simple and sustainable is more important to us than making our van feel like a house. I guess what I am trying to say is, ‘to each their own’ is what building out your van’s electrical system is all about.
I hope this helps anyone who is interested in how and why we chose to built our van’s electrical system in the way we did. We made the choices for our build to suit our needs and they may or may not be right for you. If you are interested in seeing a wider array of electrical options, we have written an article on our Freely Roaming blog that explains 5 levels of electrical systems for your own build that may help you better understand what you need.
Dan
(This post contains Amazon affiliate links to products mentioned. I’d greatly appreciate your support if you choose to purchase any of these items through our blog by clicking on the associated links.)


7 Comments
Karie · December 8, 2018 at 11:44 am
Thanks for taking the time to write this. I know some day this will come in handy to me!!! Question – in your schematic what is that thing below your fridge with the open cover? Thank you!
dan · December 8, 2018 at 12:14 pm
You’re welcome. Those are our Fantastic Fans mounted on the roof of the van.
Ivy · May 5, 2020 at 6:16 pm
Hey Dan,
Why did you decide to put a fuse panel if the switch panel had the sockets to allocate the fuses already?
Thanks!
Dan · May 19, 2020 at 12:37 pm
I liked the size and look of the switch panel so I got it just for the switches. In fact I rewired the back of the switch panel to remove those fuses as they were unnecessary.
William · August 15, 2020 at 12:41 am
Hey Dan – how is your second solar controller wired? Direct to the battery as well?
Dan · September 10, 2020 at 5:08 am
essentially yes. It is wired to the bus bars that the batteries are connected to.
William · August 15, 2020 at 12:42 am
Hey Dan – how is your second controller wired? Direct to the battery?